Sunday, April 18, 2010

LOG Pouch for May Crown comp (WoCOB)


At this very moment my current focus is on finishing a LOG pouch for the May Crown 2010 comp. Not because of the comp itself - that is just a convenient excuse for an ambitious deadline - but more because I made a 'pact' with someone that we would both make one.

I started just under a week ago and here are the progress pics so far. Enjoy! The stars are padded with bamboo wadding and are couched silver twist with silver purl in-fill. The deer is padded with 'honeybiscuit' felt from Canada. The antlers and hooves will both be in a more 'old gold' coloured gold twist couched down and the body is in quite a thick, bright-yellow-gold jap thread. All of it is couched down with Gutterman silk threads and the base is linen. The plan is to applique them onto red velvetine and make a purty pouch out of it all :) I will update pics when they become available - wish me luck with the deadline!

UPDATE - the finished product - yay! I made the deadline and my entry ended up winning its category - whoohoo! Done and dusted ;)

Consortly Duty - A new gambeson for Jattz

So Festival 2010 was approaching with about 1 and a half months to go when Jattz (Jonathon of Loch Swan) comes up with a 'brilliant idea'. He orders and buys a terrible, white gambeson that is too small and made from synthetics made from synthetics with big plastic buttons and... eek! It was awful! So despite his protesting I decided I would make him a reeeeal gambeson. One made of real materials that would not easy-bake him and one that was at least moderately pretty.

I dragged him shopping and we ended up with black linen (55%) cotton (45%) blend material, bamboo wadding for the padded parts and some cute little shiny silver buttons. In two weeks I finished the gambeson, without having a pattern prior, and it worked without any major hitches. That amazed me so much because usually I make a total mess of clothing (particularly sleeves) without constant feedback and supervision from those who know better.

I also added a couple of 'brooke' touches to it by making a blue x yellow checked collar (from the Loch Swan heraldry) and a little swan in klosterstich and Bayeux stitch on the shoulder. I was going to make swan cuffs but was seriously running short on time with only a month to make 3 sets of garb for Festival so I had to abandon the original idea :( Poor swannies!

Embroidery Sampler Class

As Festival 2010 approached I was dismayed by the A&S class lists. Not one on embroidery!!! NOT ONE! How was I supposed to learn some new and crazy thing that would take over my life?
After a little bit of hyperventilating I decided it was up to me to remedy this. Everyone who has not given embroidery a go tends to be quite scared of it but I don't think its so scary to do it. To do it well... sure, that's real hard but to do a decent job all you need is time and persistence. That's all!
After the 'Cushions of Dooooooom' I was feeling confident that people could and should learn to embroider at least something. I was also feeling inadequate in my stitch repetoire... it is never big enough! So I started looking into different stitches and developed a quick class aimed at giving a brief backgound of four stitches and then teaching them how to do the basics.
I test run the class at A&S in Polit and was terrified of the teaching part at first but it was a good idea... it showed me what i needed to do to make the Festival class run as smoothly as possible. The stitches I decided on were 14th Century Klosterstich, 16th Century Pekinese stitch, 11th Century Bayeux stitch (laid and couched) and 16th Century detached buttonhole stitch. This meant I had to learn two stitches i had never done before, and two that i had dabbled in a little bit.
So here we have my two test-run embroideries - my first ever klosterstich piece (the rose, taken from a 14th c German tapestry) and my second ever Bayeux piece (the pretty horsey from the first panel of the Bayeux Tapestry). Both are wool embroidered onto linen.


The design for the sampler on which to practise the stitches was designed using pics from extant items that I stumbled across during my look into the four stitches.
The square ended up being 12cm x 12cm in size, which turned out to be ample. We, of course, did not get through even a significant amount of the embroidery in this design in the class but the intention was to give them some 'homework' to practise :)
To Festival I took 10 kits to do the embroidery - all wool on a cotton base - with the design already drawn out. Gosh that is a tedious process btw :P Thankfully I guessed right and ten people showed up to participate. Convenience! Now I am looking at teaching the class to the College of St Aldhelms at the request of the vivaceous seneschal Adelle and there may be crazy-ish plans for future classes on different stitches.
Moral of the story - anyone can learn to embroider. And saying 'I can't sew' is a load of hogswash. Anyone can do it!

Bur-badges

Hey again,

So to the left we have what results from Burbage crossed with Badges - a Bur-badge! It was cast by me from pewter. There are still debates about whether to leave them silver or paint them like the one in the picture. It's all good - there will probably be a few of each. I have made about 18 of them and was supposed to distribute them for festival but forgot to my dismay! Oh well, next big event, out they come! These badges have pins glued to the back to attach to clothing and are oh-so-mill-rindy :)


Household Fighting Gear

Hey all,
Yes - I am a slacker. I have decided I would FINALLY update some stuff today that I have done :)

So, in update, I began making a household fighting jacket. It started off like any regular project - get help with patterns from the magnificent Mathilde, cut it out, sew it together, make bias, sew down bias, etc etc (see pic left- except for the hem and buttons it is done :)
Okay. So that's all well and done. I will finish it eventually and I will wear it and it will be fun. Though, the next problem was that I need fighting trews to go with it, other than the icky option of trackpants. So again - it started off like any regular project with patterns, careful cutting out and sewing (haha - yes, I am learning slowly that I need to go more slowly... how ironic...)


This is where 'Brooke brain' came into it. You see, to finish the trews and jacket i needed buttons. Buttons I did not have and I didn't want to use any ordinary, boring, cruddy buttons. No no no - not after all of the sewing... so I started thinking about where and how I could get buttons. Then a light went on - I could just make buttons, right?

So instead of going to a store and buying buttons like a regular person I sat down and had a crash lesson in pewter casting from the talented Mr Rob the Vet and set out to carve and cast my own buttons. The result was just over 80 buttons, silver, small and with the Burbage household symbol on it (mill-rind). Why 80 buttons since I only needed 24? Well... there was that much pewter :P Apparently 2 pewter cups can make 80 pewter buttons.

Apologies for the rushed rant but I felt it was necessary to attempt to connect how my brain jumps from one thing to another, to another in such a random fashion :P
Note: I know the buttons have their misgivings but I don't think they turned out too badly for a first attempt at pewter casting. I should also note that the buttons have a ring of pewter on the back to sew them down by :)


Saturday, January 23, 2010

Apprentice Baldric

This is my current project (well, at least the one I am trying to do over all others right now). It is an 'apprentice baldric' and was tasked on me by my laurel Mistress Mathilde. It has a green velvet base with padded goldwork - kind of a goldwork sampler.


The baldric is to go with my red brocade houpelande (sp?). It will be fringed with a bunch of silver bells (hoorah!). The design is adapted from an embroidered linen shirt, though it has been changed quite a bit. The motifs of acorns and central sunny splendour are to represent Mathilde and the feathers represent my proposed heraldry. I am fond of the acorns... aren't they so cuuuute? :P Isn't it great to be a walking billboard of owned-ness (lol - Georgia knows what Im talkin' 'bout!)

First Illumination - AoA Scroll

This is my first attempt at illuminating a scroll. It is an AoA from the reign of Siridean and Siban. The calligraphy is printed onto the thick card before hand, so it is more like 'paint by numbers'. We also had three colour combinations to choose from as a guide, the instruction of Leonie DeGrey and a whole bunch of gouache. Oh yeah :P


First Embroidery... ever....


Alrighty then. This is where the madness began. I had been in the SCA a couple of months... literally... and I was at my first ever A&S meeting at the Baronial dwelling where Mistress Porsha was trying to recruit people to embroider the lids of pouches that were being made for the K&Q (Alfar and Guthrin (sp?) to present to all of the Barons and Baronesses. I had never embroidered in my life, and yet put up my hand (how very like me) and here are the results. Once these two were done (for Isobel and Alessandro) I also helped sew my first ever eyelets on some of the pouches at festival 07. I have long since fallen out with eyelets (lol).

Friday, January 22, 2010

Goldwork Cuffs


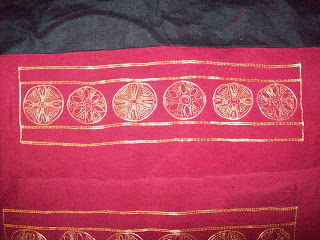
These are a pair of cuffs made for Engelin's coronation. The base is red silk and the emroidery is couched gold jap. The first roundel has 4 cicada/bee insects alternating around triangle spirals. The second roundel is a flower with triangle spirals between the petals. The design is Merovingian and was composed by Mistress Porsha. Unfortunately it is difficult to take a nice photo of the cuffs due to the shiny silk and shiny gold thread, but hopefully you get the jist of them :) Below is a pic of Theoderic and Engelin at their coronation, in which you can see one of the cuffs.

Mouse Pouches


hese are two mouse pouches I made. The pouch itself is red wool with cotton fingerloop braid for the edging/handle. The mice are chain stitched with white wool. *squeak*squeak*

Bayeux Tapestry Style

Isobel le Breton and myself worked to design and produced a gift for Siridean and Siban during their reign. The reign was in the style of Norman/Anglo Saxon around 1066 and so it was only fitting we did a panel from the Bayeaux Tapestry.

The first is a pic of the frame we based our frame on.

The second pic is of the coronation of Siridean and Siban.

Third is a pic of our work - a combination of the original frame of the tapestry, the coronation photo and our own personal touches (e.g. the animals in the borders). If anyone would like to read the documentation we wrote on this work, just let me know and I will email it to you :)


Split-Stitchin'

Split-stitch is one of my favourite stitches. It is relatively fast and great for 'freestyle' type patterns. So here are some pics of some of my split-stitch items :)
Top is a badge for Mistress Isobel le Breton and Bottom is 2/3rds of a firestriker and flint badge.

More pics to come.

Monday, January 18, 2010

Pewter-licious

These are photos of my first ever attempt at pewter casting. The mold is made up of three soapstone parts: the base (with the carved mill-rind) and two top pieces (sitting side by side on the left hand side).

The design is a mill-rind, which happens to be the charge of the Burbage house device.

I was quite surprised by how easy it was to carve into the stone. A pocket knife, metal file and two drill bits were used to carve the shapes and a hand saw was used to cut the blocks. The pewter was sourced from some old cups which were melted in a saucepan on a regular gas stove-top.

It was quite fun to watch the cups melt :P When the pewter is nice and hot and melty it is poured into a hole that sits in between the two top mold pieces (left hand side in both pics, they are sitting right up next to each other). You have to tip it quite quickly so as not to allow the pewter to cool at all; if it cools it doesn't pour all the way through the mold and you only get half of your shape cast.

I made these mill-rinds as badges for my household (literal badges). I made 18 in all and have now glued pins to the back - hooray for household bling :D